Calibrating your scanning questionnaire
Calibration is performed before the completed questionnaires are scanned. This ensures the accuracy of the scanning process. The calibration process requires you to mark four response boxes per page in the survey. These settings are saved and referenced when scanning the questionnaires. The boxes selected by Snap are normally the tick boxes that are closest to the corners of each page.
Requirements before you start
Before starting, you will require the following
- A blank finalised and published questionnaire or the first case of cases that you wish to scan.
- A scanner that is either directly connected to the PC which has Snap installed on it or that can save images (TIFF or PDF) to an accessible drive.
Calibrate the questionnaire
- Open the Data Entry window
 and select Interview Mode
  .
. - Click on Tailor
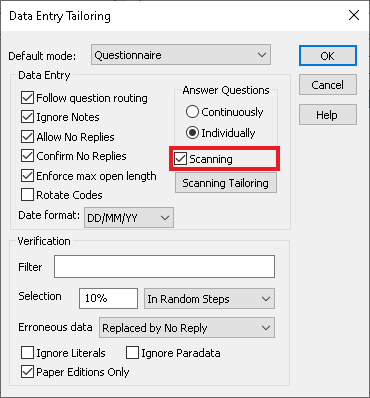
 on the Data Entry toolbar and select Scanning. Click OK to return to the Data Entry window.

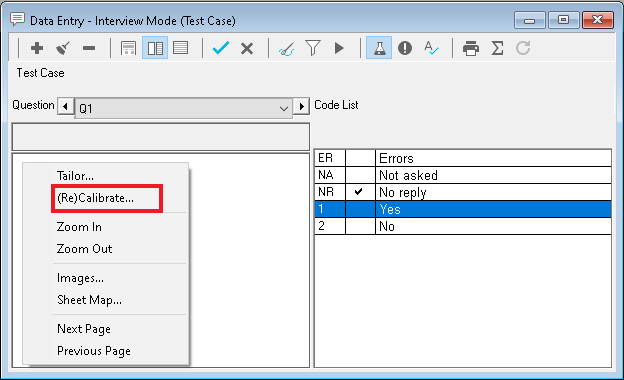
- Move the mouse pointer over the left hand side of the window (which is blank) and Right Mouse click, select (Re) Calibrate.

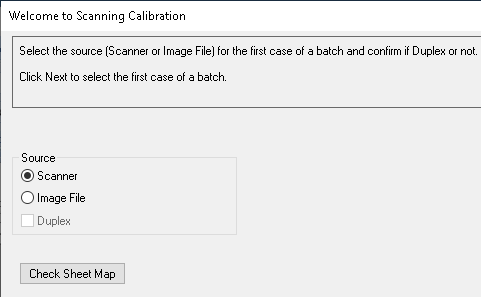
- This opens the Welcome to Scanning Calibration window. The Calibration Wizard guides you through the calibration process. Click Next.
- The next step is to scan the (test) case that you wish to use for calibration. You can use a blank finalised and published questionnaire or the first case that you wish to scan. Select the source for this case, which can be either:
- Scanner where the case will be scanned from a scanning device attached to your PC
- Image File where the case is loaded from an image file (e.g. TIFF, PDF) saved on an accessible drive.
- Select Duplex, if the case is printed on both sides of the paper.
- Click Check Sheet Map to view and edit the Sheet Mapping for the questionnaire. You can select the appropriate layout including duplex and booklet.

- If you are scanning directly from a scanner, under Source, select Scanner then click Next. When asked, you need to place a blank questionnaire into the scanner. Click OK to start scanning.
- If you are using image files under Source, select Image File then click Next. When asked, you need to locate and select the image file. Click Open to load the image file.
- After the questionnaire has been scanned or loaded you will see the image on the right hand side of the window. The on-screen instructions will advise that it needs calibrating, click Next.
- Follow the on-screen instructions shown at the top of the Calibration Wizard. These instructions will tell you where to click in the image of the scanned questionnaire. Click Next after completing each instruction.
- When the calibration is complete, you will see the message “All pages are now calibrated correctly. Click Finish to continue and scan your responses“. Now that the questionnaire has been calibrated, all future scanned questionnaires will use the markers you have identified in the above process.
