Dynamically changing the website shown on submit
When participants complete the online questionnaire, you can set which web page they see. The website address can be fixed text but it can also include one or more survey variables.
The variables used may include
- a question response that can be a web address or inserted as part of a website address.
- a derived variable, which identifies all or part of a website address, that depends on the responses.
- a system or paradata variable.
This tutorial uses Snap XMP Desktop to show you how to use a derived variable as the on submit web address.
The variable data that replaces the variable name depends on the type of question:
| Response type | Information used |
| Quantity, Date, Time or Literal response | Participant’s answer |
| Single response | Code label |
| Multiple response | The response code labels are joined into a comma separated list |
Step1: Setting up the question
- In the Survey Overview window, open the survey in the Questionnaire window.
- Click New Question
 to add a question and select Single Choice from the option list.
 - Enter the question text.
- Press Tab to create the different choices and complete the code labels. The answer chosen determines the web page shown after submitting the questionnaire.
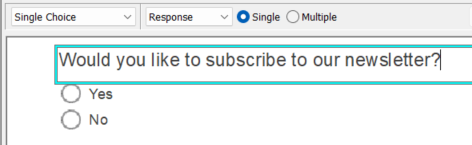
- Click Save
 to save your changes.
 - Select Response in the Toolbar Topic menu, and select Single response.
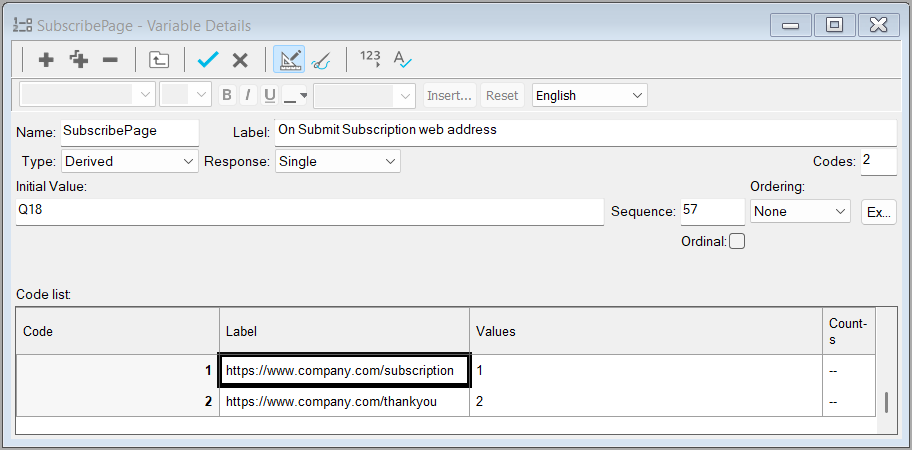
Step 2: Creating the derived variable
-
Click Variables
 on the main toolbar to open the Variables window.
-
Click New Variable
 to create a new variable.
- Set the variable properties
- Name: SubscribePage
- Label: On Submit Subscription web address
- Type: Derived
- Response: Single
- Initial Value: Q18 (the question asking the respondent if they want to subscribe)
- In the code label add the on submit web address for each option to the question. In this example, the subscription page is returned when the respondent selects yes, and the thank you page is returned if they select no.
Step 3: Setting the On Submit web page
- In the Questionnaire window, click Questionnaire properties

- In Section, select Submit.
- In On Submit, select Web page.
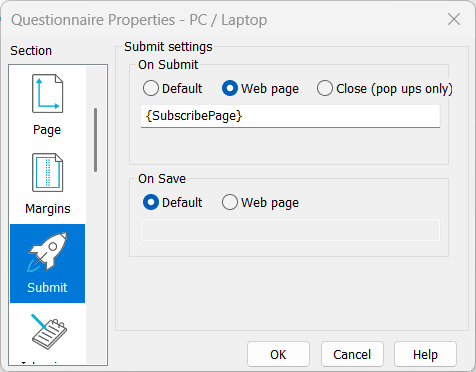
- Enter the derived variable name {SubscribePage} inside curly braces into the text box. The variable name must be inside curly braces {}.
-
Click Save
 to save your changes
Step 4: Publishing and testing the questionnaire
- Click Publish to open the Publish Questionnaire dialog.
- In Method, select Publish with preview.
- Click Publish to publish the survey.
- In the web browser, make sure that the correct web page displays when the respondent clicks the submit button.
Alternatively you can publish in Snap XMP Online.
- Log in to Snap XMP Online and select your survey in Your Work.
- In Summary, click the Collect link.
- Click Publish current version to publish the survey.
- Click Launch preview to test the questionnaire. Make sure that the correct web page displays when the respondent clicks the submit button.
If there is a topic you would like a tutorial on, email to snapideas@snapsurveys.com