Enhance with Email Alerts
Email alerts are emails sent out, to a specific email address, when the submitted response includes a particular answer or set of answers. For example, you could send an alert to the sales team when a customer requests a brochure, as part of the survey.
You can enhance your project using the email alert feature, which is available in the Snap XMP Desktop app.
Information you will need
Before you set up the email alert you will need:
- The email address that you want to sent the email alert to, such as, the sales team.
- The text of the email, which can include information from the response.
- The conditions that trigger an email alert, such as, the customer has requested the brochure.
- The email format, which can include plain text or HTML format. HTML emails let you include text formatting and variable fields, whereas plain text improves accessibility.
Open the questionnaire
- Click Survey Overview
 on the Snap XMP Desktop toolbar. This opens the Survey Overview window.
 - Select Online surveys
 to show all the online surveys available.
 - For an online survey, click > to expand the folder containing the survey, if required.
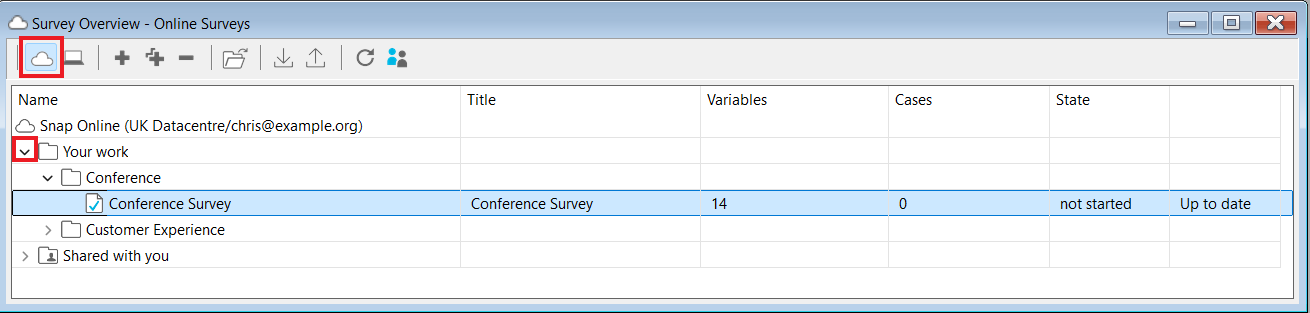
- When you have found the survey, double click on the survey name to open the survey. Alternatively click on the survey name once to highlight it and then click
 or press Enter to open the survey.
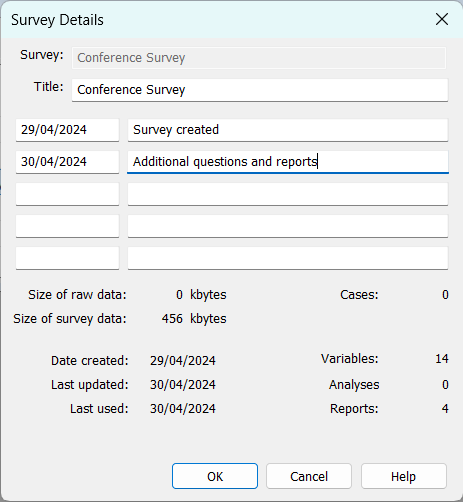
 - This opens the Survey Details dialog, which shows the name, title and other notes for the survey. The survey name cannot be changed but the Title and comments can be edited, if required.
- Click OK. The Survey Overview window closes and, by default, the questionnaire opens in the Questionnaire window. You can now edit the questionnaire.
Create an email alert
- In the Questionnaire window, click Questionnaire Properties
 on the toolbar. This opens the Questionnaire Properties dialog.
 - Select Alerts in the Section panel to display the email alerts.
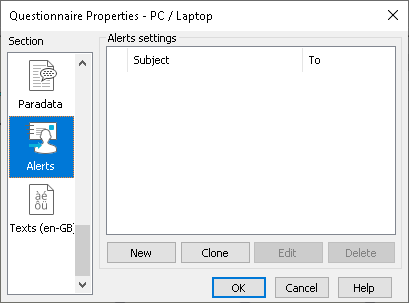
- Click the New button to create a new alert. This opens the Email Alert dialog.
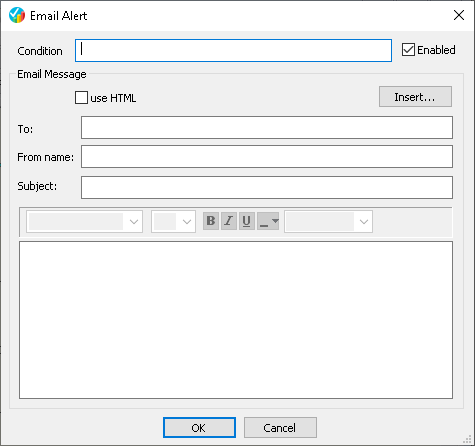
Add the alert condition
The condition is the rule that must be satisfied in order to trigger the alert and send the email. The rules are written as expressions which are either true or false. For example, Q10 = 1, which is true if the respondent has selected the first answer in a single choice question, named Q10.
Enable or disable the alert
The Enabled checkbox determines if the email alert is active or not. Enabled is selected, by default, meaning that the email alert is active.
If you wish to disable the alert, clear the Enabled checkbox. The email alert will not send an email when it is disabled.
Create the alert message
- Select the use HTML box to use HTML formatting, including font type, style and colour, or any HTML code.
- In To, enter the address of the person who will receive the email. If you wish to send to multiple recipients, separate each email address with a semi-colon. You can also use the Insert button to insert an email address variable from the questionnaire, allowing the alert to dynamically populate the email address using text substitution. In this way, the respondent could receive an email alert confirming their response submission. The field will show the variable in curly brackets {}.
- In From name, enter the sender name for the email.
- In Subject, enter the subject of your email in the Subject field.
- Enter the content of the email. You can use the Insert button to insert variable fields from the questionnaire (for example, the date, site, etc) in the email body as well as the To, From name and Subject fields. If you insert the answer for a coded question it will display the appropriate answer label. The variable field has curly brackets {} to show that it is a variable.
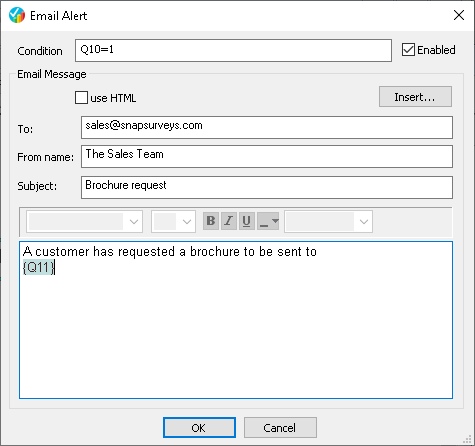
- Click OK to save your settings. The alert is added to the list of alerts
Publishing the questionnaire
You will need to publish your questionnaire for the email alerts to become active. The email will be sent each time a respondent submits a response that meets the email alert condition.