Scanning a booklet
In Snap XMP Desktop, questionnaires can be printed as a booklet. When publishing a booklet questionnaire that will be scanned then make sure, the pages are scanned in the same order as the published booklet. If you publish a questionnaire in normal format, and then send the pages to an external print house to be converted into a booklet, Snap XMP Desktop will not automatically recognise the questions when you scan them in, as the questionnaire size and page order has changed. You can change the scanning settings to help recognise the questions, but it is not as reliable as creating a booklet questionnaire in Snap XMP Desktop.
This tutorial describes how to create a questionnaire in booklet format and then scan the returned questionnaires. The steps assume that you have an existing scanning questionnaire that has been set up according to the advice given in Planning your scanning survey.
Set up the questionnaire as a booklet
- In the Survey Overview window, select and open the scanning survey in the Questionnaire window.
-
If required, you can preview the scanning questionnaire by clicking the Print Preview
 button on the Questionnaire window toolbar. This opens the print preview of the questionnaire where you can check the size, layout and number of pages. Click Cancel to close the preview window.
-
Click the Questionnaire Properties
 . This opens the Questionnaire Properties dialog.
- In Section, select Page then select Print as booklet.
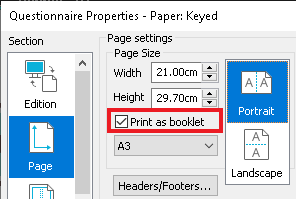
- Set the paper size you will print on. Select the questionnaire orientation. Portrait assumes that the booklet opens like a book. The dotted line shows where the fold would be. The example shows a questionnaire to be printed on A3 paper and folded to A4. It will put two A4 portrait pages on a single A3 landscape sheet. You would need to set the printer to A3 landscape as that is how the paper is printed. To create an A5 folded booklet you need to set the Snap settings to A4 and Portrait. You would then set the printer to A4 landscape.
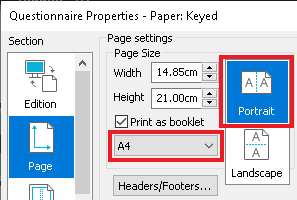
- Click OK to save the settings.
-
Click Print Preview
 to preview your questionnaire. The number of pages will have doubled and the pages will have reduced in size. Close the preview window.
- Select File | Publish to publish your questionnaire as a booklet. The dialog will include the text Booklet Printing Is On. You can adjust the layout of each page of your questionnaire by changing the Spacing value below this text.

In Printer setup, you can set the printer to landscape printing and double-sided as required. Make sure that the printer is NOT using booklet printing.
Scanning the booklet
This step assumes that the questionnaire was published in Snap XMP Desktop as a booklet and that the scanner has been set up correctly.
You will need a blank questionnaire booklet (with any staples removed) to calibrate the questionnaire.
- Prior to calibration, scanning needs to be activated. This is done in the Data Entry Tailoring dialog. Select the Tailor | Data Entry menu.
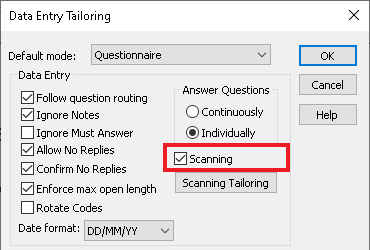
- Select the Scanning option then click OK to save your settings.
- Click Data Entry
 on the Snap XMP Desktop toolbar. This opens the Data Entry window.
 -
Click Prompted Mode
 on the Data Entry window toolbar.
- Click the right mouse button in the left-hand half of the window, and select Calibrate from the context menu. Click Next.
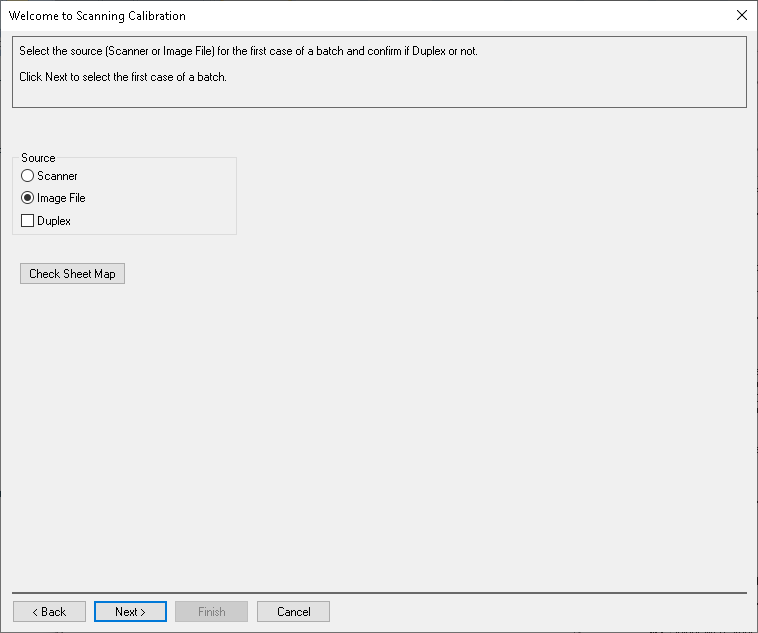
- Click Check Sheet Map. This opens the Sheet Mapping dialog. The Layout will be set to Book if Print as booklet was selected when the questionnaire was published. If Duplex is checked, double-sided pages are expected.
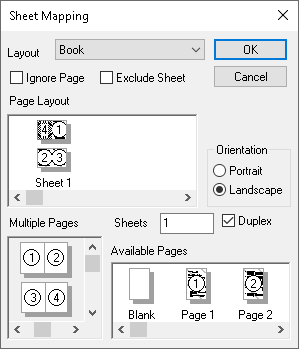
- Check that the settings are correct and click OK to return to the calibration.
- Click Next to start the calibration and follow the on-screen instructions. (You will need to scan a blank booklet, starting with the sheet containing the first and last pages of the questionnaire.)
- When you have finished calibrating the questionnaire, click Finish.
- Test that a completed response booklet scans correctly. You can then scan your questionnaires as normal.
Scanning a booklet from a standard questionnaire
If you have not used the Print as booklet in the questionnaire, the scanning process expects to scan normal pages. You will need to calibrate the scanned questionnaire in Snap XMP Desktop for it to be recognised as a booklet.
- Prior to calibration, scanning needs to be activated. This is done in the Data Entry Tailoring dialog. Select the Tailor | Data Entry menu.
- Select the Scanning option then click OK to save your settings.
- Click Data Entry
 on the Snap XMP Desktop toolbar. This opens the Data Entry window.
 -
Click Prompted Mode
 on the Data Entry window toolbar.
- Click the right mouse button in the left-hand half of the window, and select Calibrate from the context menu. Click the right mouse button in the left-hand half of the window, and select Sheet Map from the context menu.
- Select Book in the Layout dropdown list.
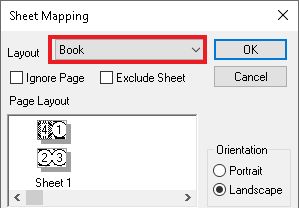
- Check through the options to make sure that they match the booklet that you are scanning, and click OK.
-
Right-click the left-hand half of the data entry window, and select Calibrate from the context menu. Follow the on-screen instructions.
This calibration is the only way that Snap has of matching the positions of responses to questions. - Scan a test questionnaire that includes responses. If this is successful, you can then scan your questionnaire booklets.
If there is a topic you would like a worksheet on, email to snapideas@snapsurveys.com