Snap XMP Desktop installation
Stand alone installation
A stand alone version of Snap XMP Desktop runs the software on a single computer. If you are installing a stand alone version of Snap XMP Desktop use the following instructions to guide you through the installation wizard.
- Run the downloaded snapdesktopsetup.exe file
- The Snap XMP Desktop installation wizard displays a welcome screen. Click Next to move to the next step.
- Enter the installation code provided with your copy of Snap XMP Desktop. If you do not enter an installation code, or if the code entered is incorrect, an evaluation copy of Snap XMP Desktop will be installed. Evaluation copies will only permit you to enter up to 25 cases.
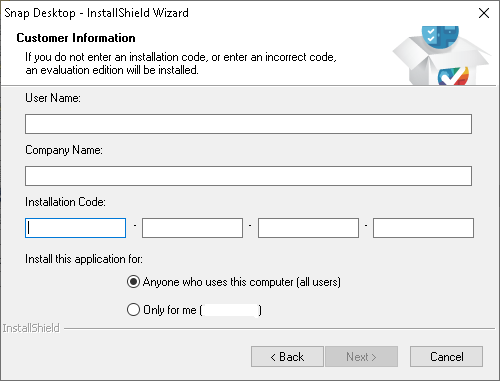
- The user name is required. The company name is optional. They are usually completed from settings stored for the current user. If other people use your machine and you do not want them to have access to Snap, then select the option marked “Only for me”.
- Click Next to continue.
- The next screen displays the software licence agreement. You may only continue beyond this screen if you accept the terms of the licence.
- Click Next to continue.
- You are asked to specify where you would like to copy the application files and the survey files. Click Browse to change the default settings. Use a drive local to your PC, e.g. C, rather than a drive on a network server; the latter may slow down the start up process each time you run Snap. The setting chosen here does not prevent you from storing surveys on the network.
- Click Next to continue.
- You are asked which components you wish to install.
- The options are:
- Program Files: this is the software and must be installed.
- Sample Surveys: example surveys to help you get started quicker and the Reference Pak.
- Images: images to enhance the appearance of questionnaires, tables and charts.
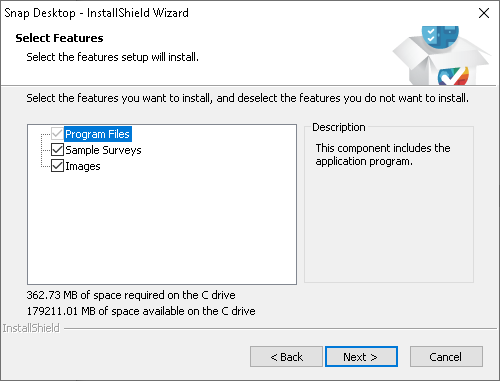
- Click Next to continue.
- Snap XMP Desktop contains dictionaries to support the spell checking process. The language you specify will determine which dictionary is used by default. Note that you can change to a different dictionary at any time within Snap XMP Desktop.
- Click Next to continue.
- Select the program folder and the installation will place a shortcut in the Start | Programs menu of Windows to facilitate start up of the application. You can select the location of this shortcut from one of the folders listed or create a new one by typing its name in the space provided.
- Click Next to continue.
- The next screen displays a list of other options.
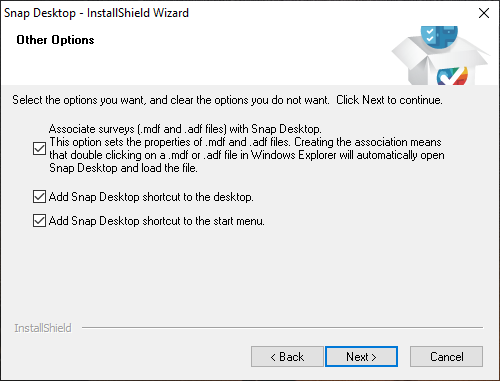
- Check the first box to associate the specified file types with Snap. This tells Windows that files whose names end in .adf or .mdf are Snap files. If you open these files they will open in Snap XMP Desktop. Associating files with an application can save time in starting up Snap XMP Desktop. The only reason for not associating these files is if another application that you use also makes use of files that end .mdf or .adf. If this is the case Windows will not be able to detect which is the correct application to use. You should not set any associations and should instead open each file from within the correct application.
- Select options that add a Snap XMP Desktop shortcut on your device’s desktop or start menu then click Next to continue.
- Confirmation of the type of licence to be installed is shown on the next screen.
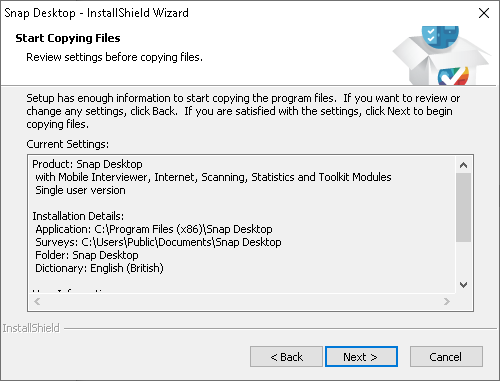
- Check the drive location (you may need to scroll down to the bottom of the screen to see it) and the name of the licence.
- If the details are correct, click Next to begin installing the Snap software.
- If you wish to change the drive location, click Back to return to the relevant screen.
- You will be kept informed of progress while the software is being copied to the computer. Only click Cancel if you want to stop the installation.
- A screen appears telling you that the installation has been completed successfully. Click Finish to complete the installation.
Network installation
In a network version of Snap XMP Desktop the software is installed on the server, and a number of clients or workstations run Snap XMP Desktop connected to the server. The number of clients is dependent on the Snap XMP Desktop licence that you have purchased.
Installing Snap XMP Desktop on your network requires the following steps:
- Step 1: Installing Snap XMP Desktop on the server using the Snap XMP Desktop licenses
- Step 2: Setting client access permissions to share the installation folder
- Step 3: Installing Snap XMP Desktop on the client computers
Step 1: Installing Snap XMP Desktop on the server
You will receive the Snap XMP Desktop software by download.
If you are re-installing on the server you must ensure that all users are logged out of the program before starting the process.
- Run the downloaded snapdesktopsetup.exe file
- Click Next to continue.
- The Snap Surveys licence agreement is displayed. You may only continue beyond this screen if you click on Yes to accept the terms of the licence. If you select No then the installation will be cancelled.
- Enter the installation code provided with your version of Snap XMP Desktop. If you have multiple installation codes, you can enter any one of them. You will be able to add the others later in the installation process.
If you do not enter an installation code, or if the code entered is incorrect, an evaluation copy of Snap XMP Desktop is installed.
- The server shows a list of licences currently available, including the one currently being installed. If this is the first (or only) Snap XMP Desktop licence then it is the only one displayed.
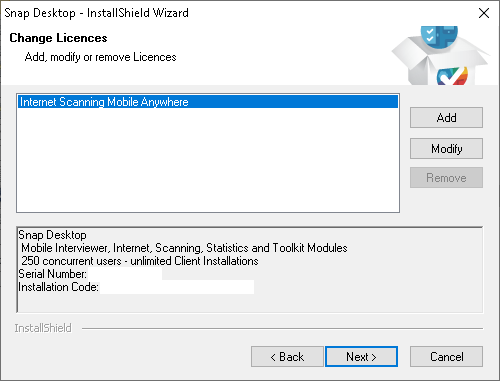
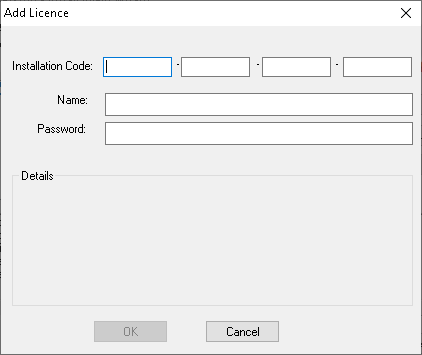
- To add further licences, click Add. For each new licence you wish to add, you are asked for the 20‑character installation code.
- Enter a default name for the licence.
- The password is optional, but if you enter one, then it is requested during the installation process on the individual workstations.
- The Modify option allows you to change the settings for an existing licence. This may be because you wish to change the name or password.
- Once you have installed your Snap licences click Next.
- You are prompted to confirm where the software should be installed. Use Browse to change the default file location. Once you have selected your desired location click Next.
- You are asked which components you wish to install.
- The options are:
- Program Files: this is the software and must be installed.
- Sample Surveys: example surveys to help you get started quicker and the Demographics and Lifestyles Survey Pak.
- Images: image files to enhance the appearance of questionnaires, tables and charts.
- Click Next to continue.
- Confirmation of each licence to be installed appears in the next screen. Check the drive location (you may need to scroll down to the bottom of the screen to see it) and the name of the licence.
- If the details are correct, click Next to begin installing the Snap XMP Desktop software.
- If you wish to change the drive location, click Back to return to the relevant screen
- You will be kept informed of progress while the software is installed on the network server. Do not click Cancel unless you want to stop the installation.
- A screen appears telling you that the installation has been completed successfully. Click Finish to complete the installation.
Step 2: Setting client access permissions
Set the network permissions:
| Folder/File | Permissions required | Use |
| Full Snap network folder and sub-folders | Read & Execute | For workstation installation and to run application |
\licences\sub-folder | Read, Write & Execute | For workstation installation and to run application |
| Snap Desktop.exe | Read, Write & Execute | During workstation installation only |
Step 3: Installing Snap XMP Desktop on client computers
When Snap XMP Desktop has been installed onto the server, you can then install Snap XMP Desktop onto the client computers, according to the terms of your licence.
If you have a fixed user licence the workstation installations are limited to the maximum permitted for the licence. The users are “fixed” to a single workstation Once this limit has been reached further installations will only be possible if you remove Snap XMP Desktop from one or more workstations.
If you have a concurrent user licence, you can install the software on any number of workstations but can only use the maximum number simultaneously. Once this limit has been reached, one user must close their copy before another user can start Snap XMP Desktop.
- At the client machine, using File Explorer or similar application, browse to the location of the network installation share created when installing Snap XMP Desktop on your network server. Locate the Netsetup Folder and run, using double-click, the file Setup.exe.
- The Snap XMP Desktop installation wizard begins by displaying a welcome screen. Click Next to continue.
- The next screen displays the software licence agreement. You may only continue beyond this screen if you accept the terms of the licence.
- The installation wizard completes your user name and company name based on the settings stored in your machine. You may edit these if required, but this does not change the settings held on your machine and Snap Surveys does not use the information.
- If other people use your machine and you do not want them to have access to Snap XMP Desktop then select the option marked “Only for me”. Otherwise you are advised to make Snap XMP Desktop available to all users of the machine.
- If more than one licence is available you are asked to select which licence to install. If only one server licence is available this step will be omitted. Select the licence that you wish to install. If a password was applied to this licence at the network installation stage, you will be prompted for the password.
- You are asked to specify where you would like to place the application files and the survey files. Click Browse to change the default settings. The setting chosen here does not prevent you from storing surveys on the network.
- Click Next to continue.
- You will be asked which components you wish to install.
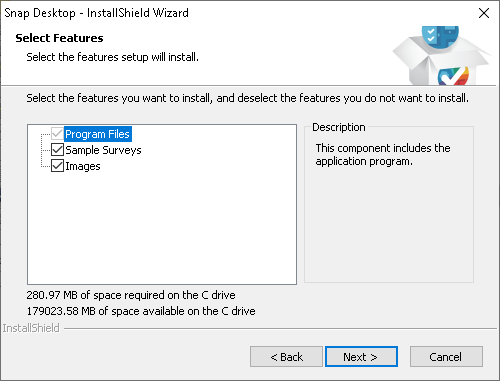
- The options are:
- Program Files: this is the software and must be installed.
- Sample Surveys: example surveys to help you get started quicker and the Reference Pak.
- Images: images to enhance the appearance of questionnaires, tables and charts.
- These will only be available if they have been installed on the network.
- Click Next to continue.
- Snap XMP Desktop contains dictionaries to support the spell checking process. The language you specify will determine which dictionary is used by default. Note that you can change to a different dictionary at any time within Snap XMP Desktop.
- Click Next to continue
- Select the program folder and the installation will place a shortcut in the Start | Programs menu of Windows to facilitate start up of the application. You can select the location of this shortcut from one of the folders listed or create a new one by typing its name in the space provided.
- Click Next to continue
- The next screen displays a list of other options.
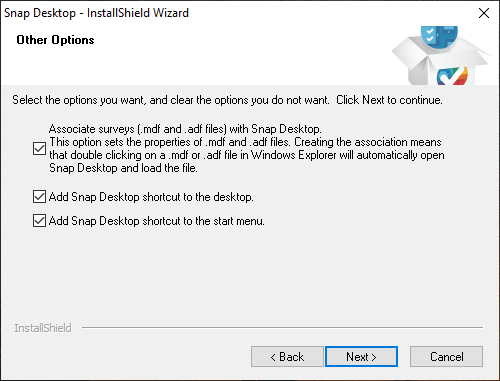
- Check the first box to associate the specified file types with Snap XMP Desktop. This tells Windows that files whose names end in .adf or .mdf are Snap files. If you open these files they will be opened straight into Snap XMP Desktop. Associating files with an application can save time in starting up Snap XMP Desktop. The only reason for not associating these files with Snap XMP Desktop is if another application that you use also makes use of files that end .mdf or .adf. If this is the case Windows will not be able to detect which is the correct application to use. You should not set any associations and should instead open each file from within the correct application.
- Select options to add a Snap XMP Desktop shortcut to the desktop or start menu and click Next to continue.
- Confirmation of the type of licence to be installed will appear on the next screen.
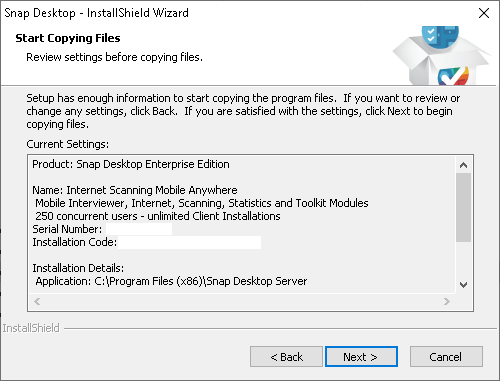
- Check the drive location (you may need to scroll down to the bottom of the screen to see it) and the name of the licence.
- If the details are correct, click Next to begin installing the Snap XMP Desktop software.
- If you wish to change the drive location, click Back to return to the relevant screen.
- You will be kept informed of progress while the Snap XMP Desktop software is being copied to the computer. Only click Cancel if you want to stop the installation.
- A screen appears telling you that the installation has been completed successfully. Click Finish to complete the installation.
Modifying a licence
To make changes to the configuration of the software, e.g. adding or removing Snap XMP Desktop components, increasing the number of users, changing the name of a licence or adding/changing a password (Network version only) you need to use the Windows feature for modifying software:
- Select Start | Settings | Apps (In older versions of Windows this may be Start | Settings| Control Panel)
- Locate Snap XMP Desktop and select it.
- Select Modify, the Snap XMP Desktop installation wizard begins.